How to Install Roof Flashing (Correctly)
Is your roof in need of some TLC? One of the most critical aspects of roof maintenance and preventing leaks is ensuring that your roof flashing is correctly installed. In this comprehensive guide, we’ll walk you through the process of installing roof flashing like a pro, so you can keep your home dry and cozy. Let’s get started on this journey to a leak-free roof!
Inside this blog:
- Why roof flashing is so critical to the health of your home
- The 5 key types of roof flashing
- 8-step process for installing roof flashing properly
Keep reading to become an expert on how to install roof flashing!
Understanding the Importance of Roof Flashing
Before we jump into the installation process, let’s grasp why roof flashing is crucial for your home:
Waterproofing

Roof flashing is a protective barrier designed to divert water away from vulnerable areas of your roof, preventing leaks and water damage. Thus, solid roof flashing can help prevent storm damage to your roof and home.
Sealant
It acts as a sealant, ensuring that joints and seams in your roof’s structure remain watertight.
Durability
Properly installed flashing can extend the life of your roof by preventing moisture-related issues like rot and mold growth.
Preservation
Flashing helps preserve the integrity of your roofing materials, reducing the need for costly repairs.
Now that we understand its significance, let’s move on to the steps for correct installation.
🧰Tools + Materials You’ll Need 🧰
Before we dive into the installation process, gather the following tools and materials:
- Roof flashing (choose the appropriate material, such as aluminum, copper, or galvanized steel)
- Roofing cement or sealant
- Roofing nails
- Hammer
- Tape measure
- Roofing felt or underlayment
- Utility knife
- Caulk gun
- Ladder or scaffolding (ensure it’s safe and stable)
Get Informed on Roof Waterproofing & Roof Leak Management
Q: What are the most common causes of roof leaks in Oklahoma?
A: High winds, hail impact, clogged gutters, worn shingles, and flashing damage are the leading causes of a leaking roof due to the volatile nature of Oklahoma weather. Heavy spring rains in cities like Moore, Oklahoma City, Midwest City, and the nearby area often make leaks more noticeable around that specific time of year as well.
Q: How can I tell if my roof leak is an emergency?
A: If you see active dripping, water stains spreading quickly, or ceiling sagging, call for emergency repair immediately. Oklahoma’s unpredictable storms can worsen leaks in hours, so local roofing companies like Palladium have a quick and effective process at managing roof leaks at the root of the issue.
Q: Can a small leak wait to be repaired?
A: The simple answer is no. Even small roof leaks in homes in our area (Norman, Edmond, and other cities around our home base in Moore, OK) can lead to mold growth, insulation damage, and costly structural repairs. It truly is an issue that spreads (and quite quickly). However, it is best practice to put a tarp over the damaged area as quickly as possible until the proper repair efforts can be made. That can help contain the issue for longer!
Q: Will insurance cover a roof leak repair in Oklahoma?
A: If the leak was caused by sudden storm damage or hail, most homeowner’s insurance policies will cover it. However, leaks from poor maintenance or age are usually not covered. So, keep that in mind and contact your roof insurance provide ASAP and then reach out to local Oklahoma roofing companies to get a variety of quotes for your roofing system.
5 Types of Roof Flashing
There are various types of roof flashing, each serving a specific purpose. Here are some common ones:
1. Step Flashing
Used around the intersection of the roof and vertical walls, like chimneys or dormers, step flashing is essential for diverting water away from potential leak-prone areas, ensuring a watertight seal at these critical junctions.
2. Counter Flashing
Covers step flashing and provides an extra layer of protection, usually seen on masonry chimneys. This additional layer acts as a second line of defense against water intrusion, offering superior protection for your home.
3. Valley Flashing
Installed in roof valleys where two roof slopes meet, valley flashing not only directs water away from this vulnerable area but also prevents debris from accumulating and causing blockages, ensuring proper water runoff.
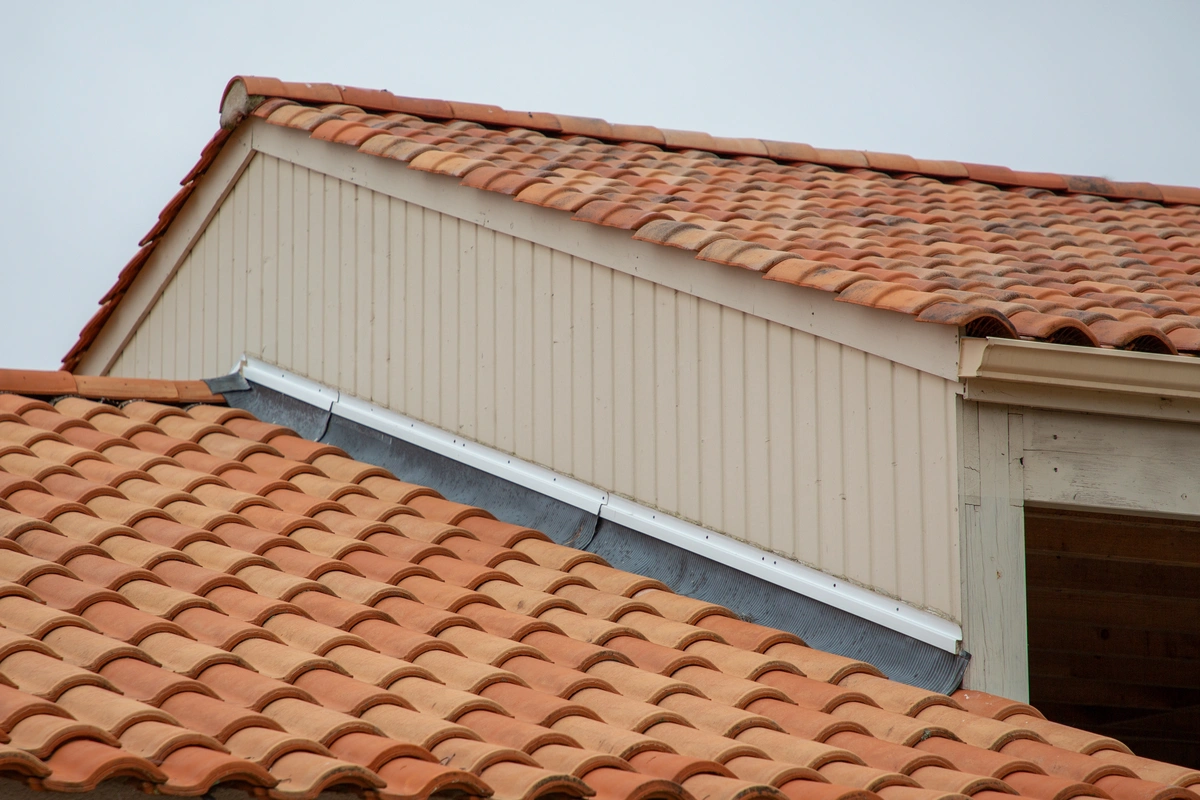
4. Drip Edge Flashing
Placed along the edges of your roof to prevent water from seeping underneath the roofing materials, drip edge flashing acts as a first line of defense against moisture infiltration, preserving the structural integrity of your roof’s perimeter.
5. Vent Pipe Flashing
Surrounds plumbing vent pipes and prevents water from entering around these openings, ensuring that your roof remains leak-free even in areas with numerous roof penetrations. Properly installed vent pipe flashing is crucial for maintaining a watertight seal.
Step-by-Step Installation Guide 📝
Now, let’s break down the process of installing roof flashing into 8 easy steps:
1. Safety First
Before you begin, ensure your safety by wearing appropriate gear, including gloves and sturdy, non-slip footwear. Use a stable ladder or scaffolding to access your roof safely.
2. Preparation and Inspection
Inspect your roof thoroughly for any existing damage, rusted flashing, or loose materials. Repair any issues before installing new flashing.
3. Measure and Cut Flashing
Measure the length of flashing needed for the area you are working on. Use a utility knife to cut the flashing to the required size. Make sure it fits snugly and covers the area you intend to protect.
4. Apply Roofing Cement
Apply roofing cement or sealant to the back of the flashing. This will help create a watertight seal between the flashing and the roof surface.
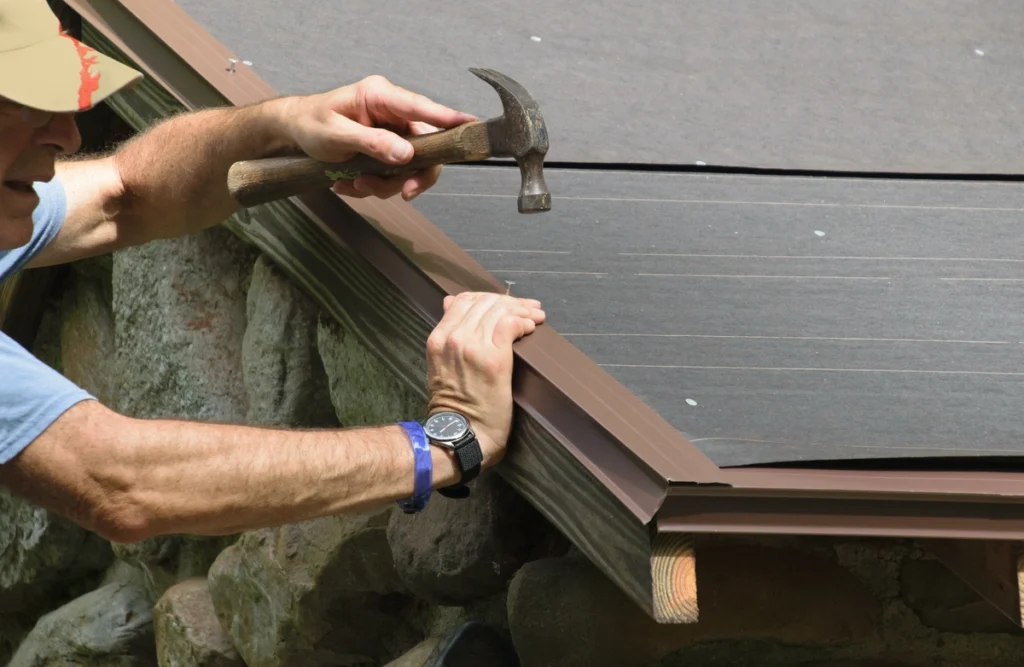
5. Install Flashing
Place the flashing in its designated location. For step flashing, slide it under the roofing material and against the vertical surface (like a chimney). Ensure it’s positioned correctly and lies flat against the roof.
6. Secure with Roofing Nails
Secure the flashing in place with roofing nails. Be careful not to overdrive the nails, as this can damage the flashing. Space the nails according to your specific project’s requirements, but typically, they should be placed about 6 to 8 inches apart.
7. Seal the Edges
Apply an additional layer of roofing cement or sealant over the exposed edges of the flashing. This will create an airtight and watertight seal, preventing any moisture from seeping in.
8. Inspect Your Work
After installation, inspect your work carefully. Ensure there are no gaps, loose edges, or areas where water could penetrate. A thorough inspection now can prevent issues later.
Maintenance Tips for Longevity
Properly installed roof flashing can last for many years, but it’s essential to keep an eye on its condition. Here are some maintenance tips:
- Regularly inspect your flashing for signs of wear, rust, or damage.
- Clean debris, leaves, and moss from your roof to prevent water from pooling around the flashing.
- Address any issues promptly to prevent water damage to your home’s structure.
Protect Your Home with Proper Roof Flashing 🏠
Installing roof flashing correctly is a critical step in ensuring the longevity and integrity of your roof. By following this guide and paying attention to the details, you can protect your home from costly water damage and leaks.
Remember that if you ever feel uncomfortable or unsure about any part of the installation process, it’s always a good idea to consult with a professional roofing contractor. They can ensure your roof flashing is installed correctly, providing peace of mind and protection for your home. So, go ahead, tackle that DIY roof flashing project, and enjoy a dry and cozy home for years to come!
Contact our roofing experts at Palladium Roofing today and experience top-notch customer service and unparalleled craftsmanship. We’re excited to hear all about your next roofing project and help you bring your vision to life!
Related Articles